Showing posts with label Gluten Free. Show all posts

Thursday, November 20, 2014

Kale Crunchy "Croutons" (Vegan, Gluten-Free)


I love a good salad loaded up with lots of dressing, croutons and other tasty, crunchy goodies. That doesn't necessarily fit into a healthy, vegan, gluten-free lifestyle though. I refuse to pay over $6 a bag for gluten free croutons, so I've been on a quest to find a decent replacement. My daughter, Leah, recently began making roasted chickpeas which I admit were an adequate alternative.

But today, after juicing my breakfast, I found myself wistfully thinking that it would be great if I could find a use for all of the pulp remnants I've had lately. Sure, I can feed them to my worms, but they have had a plentiful supply since I've been mostly drinking juices for almost a week. I know you can also use pulp in place of eggs in fruit breads, but kale bread just doesn't sound very appetizing and I don't currently plan to start making gluten-free dessert breads.

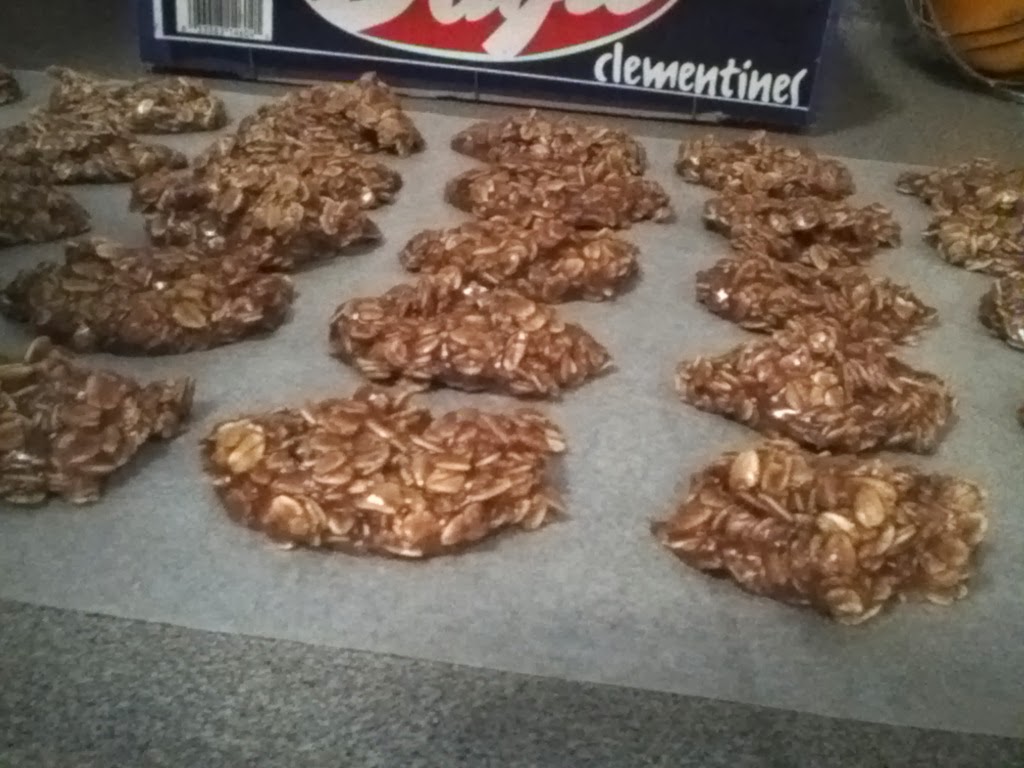
Which brings me to my epiphany for the day: Instead of making kale chips (like everyone else does), why not make kale "croutons"!

Granted, they aren't square and you won't crack a tooth on them or break a tine trying to impale one on a fork, but they turned out pretty well and I thought I'd share with you how I did it.

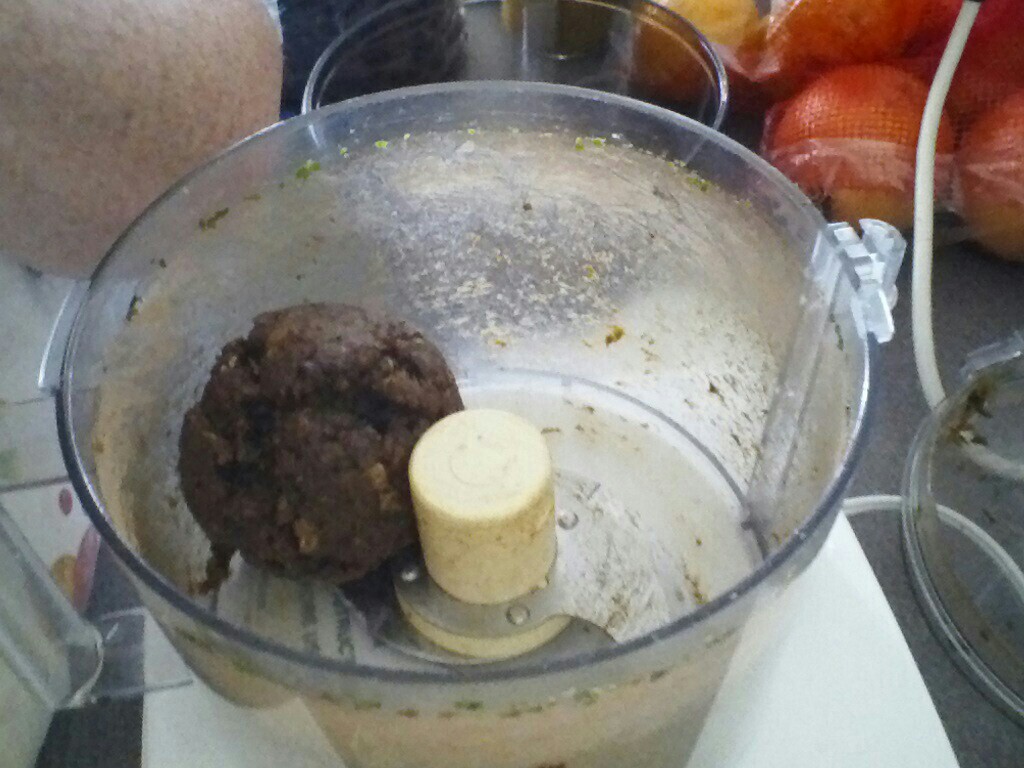
Basically, after I juiced my kale, apples and carrots, this is what was left:


You can see in the bowl that I'd already begun to separate out the kale. Next time, I'll empty the kale pulp out of the juicer before I add any other fruits or veggies. I was using curly kale. I'm not certain that you'll get the same effect with a lucinato-type kale.

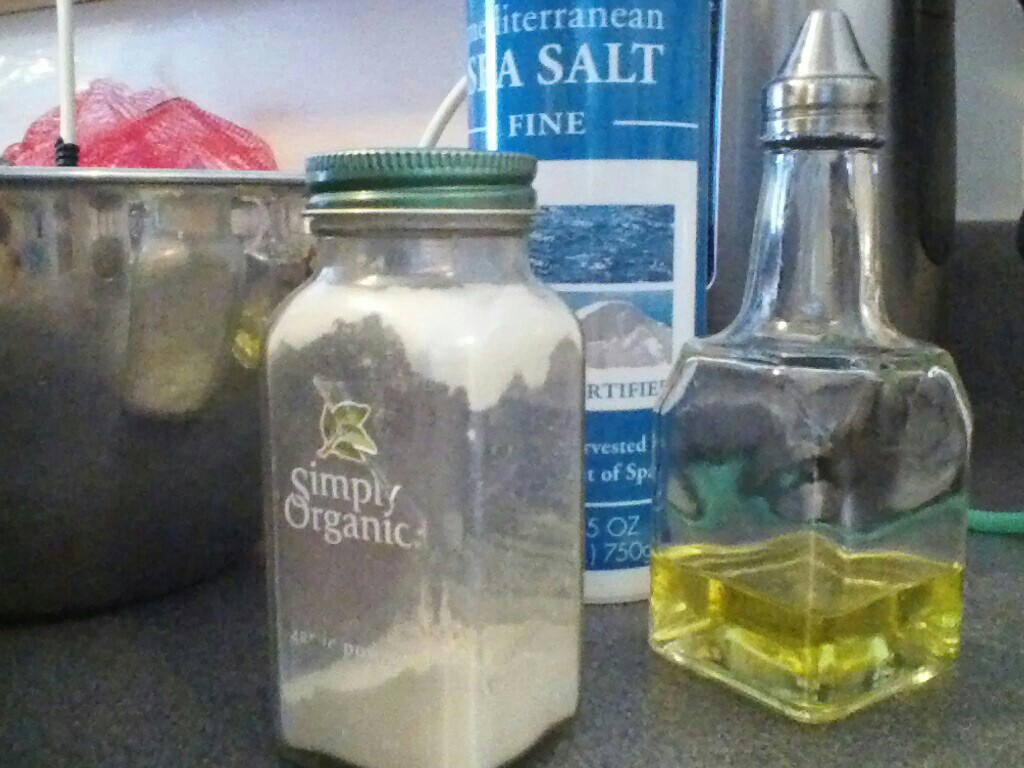
At this point, most-to all of the liquid has been removed, so I drizzled a little olive oil and sprinkled some garlic powder on them, laid them on my toaster oven pan, and began to roast them. I attempted to dehydrate them on the lowest toaster oven setting I have, which is about 150 degrees. I wanted to keep them RAW, but after 15 minutes, not much had happened to make the texture crunchy. I then roasted them at 200 degrees for 10 minutes and they were perfect. Since I had two different temperatures and times in total, here's my best recommendation and I will update this post when I make them again with more accurate information:

  • To keep them RAW, use a dehydrator or an oven/toaster oven on the lowest setting (about 150-170 degrees) and check every 15 minutes until you have the desired texture. Toss them every time you check them.
  • To get them crispier, roast at 200 degrees, evaluate every 5 minutes and toss them each time you check.
Now...I'm looking forward to my lunch salad today!


Note: I think you could use any seasoning/flavor combination that you'd like. I personally will be trying some nutritional yeast on the next batch to give them a cheesy taste.


Thursday, November 6, 2014

Lemon Spinach Quinoa Salad


This is another Kroger deli salad that we have enjoyed and for which we've created our own recipe (see also Super Food Salad). It's delicious and pretty easy. Plus, it's a good source of vegetarian protein. With 14 grams of protein in 3.5 oz of quinoa, this is one reply for all of those questioning doubters who ask vegans, "But how do you get enough protein?!"

The lemon vinaigrette dressing is a recipe I found on Epicurious. Otherwise, this recipe is just my best guess at how to replicate the Kroger version.

Dressing: 1/2 tsp. finely grated lemon zest
2 Tbsp. fresh squeezed lemon juice
1 tsp. sugar or honey
1/2 tsp. Dijon mustard
1/4 tsp. sea salt
3-4 Tbsp. olive oil

1 cup dry quinoa, cooked according to package directions
1 1/2 cups mango, cut into bite-sized pieces
1/2 cup finely chopped red onion
1/2 cup dried cranberries
1/4 c. wheat berries (soaked for 1 hour before placing in salad), optional
mixed greens, power greens or baby spinach- as many as you want to make a good sized salad

Mix all together. This is a salad that can be eaten warm or cold. If you want to leave out the wheat berries to avoid all gluten, you won't even notice a difference and could probably even substitute sunflower seeds.


Enjoy!

Friday, March 28, 2014

Now Selling Non-GMO/Organic Wheatgrass and Broccoli Sprouts


I'm going to start selling sprouts and wheatgrass. For $6.00 per container, you can pick up a standard salad greens-sized container filled with either wheatgrass or broccoli sprouts. I planted one container each of these and have been cutting the wheatgrass for over a month. I have harvested broccoli sprouts a minimum of 8 times and still have some left. 

As an added bonus is if you return the container filled with the remnants of your sprouts or wheatgrass and the soil when it is "spent" (a term that represents when the greens are done growing, you're done clipping them or they've become tough), I'll refund a $1 for the chance to reuse the container and to compost the remains of the soil and greens in my wormery.

The reason I took a photo of the seeded soil is because it will look like this...


in just a few short days. Actually, these are the container's I mentioned that we have used. I looked back and they were started the first (broccoli sprouts) and third weeks (wheatgrass) of February and I've been harvesting 4-6 times per week since then. The time has flown and I didn't realize how long I'd had them.

You must be local (Northern Kentucky/Cincinnati, Ohio area) to buy. I cannot ship these. And if you'd like to research the health benefits of wheatgrass or broccoli sprouts, click on the links below. There is a lot of buzz about microgreens right now. They are power packed with nutrition and ounce for ounce have more vitamins and minerals than the actual food. Wheatgrass can be juiced, both can be added to smoothies or placed in salads. Even if you're gluten sensitive, pure wheatgrass, without seeds, contains no gluten.

If all goes well, I'll soon be offering pea sprouts and red clover sprouts too. Contact me through Facebook, at a.barthauer@gmail.com or via Twitter (@AngelaBarthauer) if you'd like to place an order.


Sunday, January 26, 2014

Cuban Black Bean Soup

Cuban Black Bean Soup pictured with Pamela's Old Fashioned Skillet Cornbread

Given the way cold winter we've had, I have been breaking out some of our tried and true soup recipes. I found this one a few years ago on a Bob's Red Mill black bean package. I modified it to make it vegan and we've loved it ever since.

1 pound dry black beans
4 cups water
*Soak beans overnight or heat in the 4 cups water, cover and boil 2 minutes. Turn off heat and let stand for one hour. I have also successfully cooked them all day on high in a small crock pot *optional use of 2 cans black beans cuts cooking time to less than half. if you use canned beans, do not use this 4 cups of water.

1 3.5-inch piece of kombu (size is approximate!)**
3 cloves garlic, pressed
 1 bell pepper, med., chopped (2 jalapenos will add a spicy alternative!)
1 onion, medium, chopped
2 teaspoons paprika
3 teaspoons cumin
2 bay leaves (or 1 teaspoon crushed bay leaves)
4 cups vegetable stock (or the equivalent with veggie bouillon)
1/4 teaspoon chili powder (can substitute cayenne for more kick)
1 Tablespoon red wine vinegar
sea salt and black pepper to taste


Add all ingredients to beans except salt, pepper and wine vinegar. Cover and simmer for two hours if using soaked dry beans or about 30 minutes for canned beans. Add salt, pepper and vinegar. Bring to a simmer, heat through and let stand. If you used whole bay leaves, remove them before serving.

This soup can also be served over cooked brown or white rice.

**Kombu is a wide leaf, deep growing sea vegetable that is used in soup or soup stock. When you add it to dried beans, it helps to tenderized them and cut cooking time considerably. it also contains natural sodium, thus cutting the amount of sea salt needed for flavor. One 3.5-inch piece has 170 mg potassium and over 100% the RDA of iodine, 6% RDA of magnesium and 2% RDA of calcium, making it an excellent addition to a vegan diet!


Wednesday, January 15, 2014

No Bake Cookies, Vegan Style


My friend, Heather, asked me for this recipe recently and I realized that although I would be a very rich woman if I had a dollar for every time I've made these, I have no recipe down on paper. So...here it is.

The original, my older siblings brought home in a Mulligan Stew comic book when I was in early elementary school. By the time I was in high school, I had it memorized. Here is the original contents:
1/2 cup butter (1 stick)
1/2 cup milk
2 cups sugar
2 Tablespoons peanut butter
1 teaspoon vanilla
2 Tablespoons cocoa
3 cups quick cooking oats

To be honest, I foresee no way to make this recipe "healthy". Instead, I can offer the following as a healthy-ish option.

1/2 scant cup coconut oil
1/2 cup coconut or almond milk
2 cups evaporated cane juice or rapadura sugar (these are usually Vegan)
2 Tablespoons nut butter of choice
1 teaspoon vanilla (preferably Fair Trade)
2 Tablespoons cocoa (preferably Fair Trade)
3 cups rolled oats (not quick cooking)

  1. Place oil, milk, sugar and nut butter in 2 quart saucepan.
  2. On medium high heat, stir occasionally and bring mixture to a boil.
  3. IMPORTANT- set timer for one minute and allow mixture to boil while stirring only enough to prevent it boiling over.
  4. When timer goes off, immediately remove the pan from heat.
  5. Stir in cocoa, vanilla and oats until blended.
  6. Lay out enough waxed paper for cookies (about 15-18 inches) on a countertop.
  7. Drop cookies by desired sized spoonful.
  8. Allow to cool.
  9. Enjoy!


If you've prepared them properly, the first ones dropped onto the waxed paper should be setting up by the time you put the last ones in place. 

I have successfully learned how to cut this recipe in half also, but I wouldn't suggest attempting it until you're familiar with the consistency,as the timing does need adjusted lower, but not completely in half.


Friday, December 6, 2013

Vegan Creamy Hot Cocoa Recipe


Here in Northern Kentucky we had an early dose of a White Christmas. Colder temperatures (it was 65F two days ago, 20s today), some ice and now snow helped encourage us to hunker down for the day, stay in our warm jammies and enjoy a snow day from school.

Tonight, I thought I'd treat the family to some yummy hot cocoa. No...I do not buy packets or mixes. Even if I can pronounce all of the ingredients, it will probably consist of some form of dry milk powder, cheap (non-Fair Trade) chocolate and oodles of sugar. My recipe is not original. I simply modified this hot cocoa recipe to make it healthier and vegan. This recipe serves four, but we divided it into fifths and it was plenty for each of us.


You'll need:


Combine the cocoa, sugar and salt in a saucepan. Stir in boiling water and bring this mixture to the point where it is just beginning to bubble. Cook and stir for two minutes. Do not let it scorch and if it begins to have a strong hot-to-possibly-burning chocolate smell, reduce heat. Add in the 3 1/2 cups of coconut milk. Stir as you heat it to a hot temperature..without boiling it.

Yes, we like Disney mugs!

While the mixture is heating, shake your can of full-fat coconut milk (cream) vigorously. Otherwise when you open the can, you may have a large chunk of solid coconut fat at the top. Place about 1 Tablespoon in each  mug. This will help cool off the cocoa so no one burns their tongue. 

When the cocoa is hot enough, remove from heat and add the vanilla. Divide into mugs, stir to blend with the cream and enjoy!


**I added 1/4 teaspoon organic, high-quality cinnamon to the saucepan in the first step and it was delicious!**

In place of the vanilla, I think you could experiment with flavors like peppermint, almond or orange and still find it to be very yummy.

Tuesday, November 26, 2013

Snicker Doodle "Larabars"


Several months ago, I shared a recipe for our homemade Chocolate Mint "Larabar" Recipe. We make Larabars about once a month and have experimented with many different flavors. My daughter, Abbey, I think hit upon the best one yet. Last week she purchased some of the authentic Larabar holiday flavors and we couldn't believe how much the snicker doodle one tasted exactly like a cookie.

She set upon the task of making her own version...and she nailed it!

  • 1 cup raw cashews
  • 1 cup raw almonds
  • 2 cups pitted dates
  • 1 teaspoon vanilla extract (preferable Fair Trade)
  • 1/2 teaspoon sea salt
  • 2 teaspoons organic cinnamon (this can be adjusted to taste)
Grind the cashews and almonds in your food processor or blender until a coarse meal is achieved. Place a scant amount of these crumbs in the bottom of your dish to prevent sticking. Put the rest of the nuts in a large bowl. Next process the dates until they are broken down and begin to form a ball. It's difficult to describe this. They don't really chop, grind or liquefy. They basically mash down and then begin to stick together. Place the dates in the bowl with nuts. (Now this is the messy part!) Add your vanilla, sea salt and cinnamon and mix all together by hand until a soft ball forms. Spread the mixture in any pan, cover and refrigerate. A small bread loaf pan can give you the approximate thickness of a real Larabar. Using a larger pan, means thinner bars...but it is not a runny mixture so you can shape it in the pan to be smaller, as Abbey did in the photo above. I have also read blogs where people shape them and wrap in wax paper. No need to refrigerate for a long time before eating.

These are absolutely delicious. No need for baked cookies filled with white, sugary badness this holiday season. Instead, make some raw, vegan "Larabars" that will satisfy that sweet tooth just as easily.


Sunday, November 24, 2013

Chai Tea Smoothie


This morning, I had a simple, yet tasty smoothie, that I thought I'd share with you.

Ingredients:
  • 1/2 cup, full strength Chai Tea, cooled (preferably Fair Trade)
  • 1/2 cup unsweetened coconut milk, (I prefer organic So Delicious)
  • Whatever extras you want ( vegan protein powder, maca, etc)
  • 2 Tablespoons sweetener of choice (I used local, raw honey but agave, maple syrup and stevia would work as well)
  • 2 frozen, ripe bananas
  • 1 cup ice (small cubes work best)


Place the cooled tea, milk, "extras", and sweetener in the blender. If you have a very tight fitting lid, give it a few pulses. Otherwise, wait until you add the frozen bananas and ice to give it some thickness too.

Some of my "extras"

With all ingredients in blender, pulse or blend until combined. Enjoy!


Saturday, August 10, 2013

Vegan Coffee Non-Dairy Creamer


If you're my Facebook friend, you probably saw me post a photo from someone (who knows how it came to my newsfeed!) that was a base recipe for making your own creamer at home. I know my recipe title is a little redundant, because Vegan should automatically signal that this is non-dairy. But without using the names International Delight and Coffee-Mate, I wanted to convey the idea of what I was trying to create. The post I'd shared on Facebook did include dairy, so I didn't see how it was similar to the store-bought flavored creamers. And since I don't have a degree in chemistry, combining partially hydrogenated bromated genetically modified oils, corn syrups and artificial flavors is not something I will achieve at home anytime soon...nor would I want to!

So here is my hopefully somewhat healthier version I made today. I'm not trying to steal anyone's Facebook thunder, but I couldn't copy and paste a link to the original here, so the additional flavors I've included below did originate with someone...somewhere in the great beyond of social media. I take no credit for the flavors, just the healthy modifications.


I decided to try the Cinnamon Strudel flavor, so I needed the following items: refrigerated coconut milk, canned full-fat coconut milk, evaporated cane juice crystals, vanilla, almond flavor and cinnamon.

I measured out 1 cup of refrigerated coconut milk. [I am not brand loyal and would prefer to buy So Delicious Organic brand, but it is no longer available at my local Kroger store except in the rather expensive shelf-stable version] Next, I added this coconut milk to a small pot on my stove and stirred in 1 tsp of  high-quality organic cinnamon (use a little more if you'd like more or if you have regular cinnamon) and 1/4 cup organic evaporated cane juice crystals. Whisk constantly on low to medium-low heat until all cinnamon and sugar are dissolved. 

Once this is ready, pour into the container in which you plan to store it. Add the entire can of full fat coconut milk to the container along with the 1 teaspoon organic almond flavor and 1 teaspoon organic vanilla flavor and stir. I used a wide mouthed Ball jar.


It was delicious. I used some in place of milk with one shot of espresso to make a latte'. I did steam it, but it didn't foam as well as coconut milk does by itself. I will admit that it was too sweet to finish. I think the same amount in a cup of coffee would have been just right. I have always been a "more flavor/creamer than coffee" person and yet, today it was a little too rich. You could also try less sugar; using Sucanot instead of evaporated cane juice; increasing the amount of refrigerated coconut milk to 2 cups for a thinner version; or even trying agave or honey instead. I think that will be my next batch. The reason for the sugar is to try to replace the sugar in sweetened condensed milk from the original recipe.

In the original, it was suggested that you should place all ingredients in a Ball jar and shake "like crazy". I think this would easily leak...a lot. I think if everything can be stirred, a Ball jar will work well. If you need to shake it all to blend, I would suggest something with a tighter lid. I have several notes below that include additional flavors.

This really is delicious and if I could find reasonably price refrigerated organic coconut milk, the whole thing would be organic. You could use almond or rice milk too if you don't like the taste of coconut milk, but the fat in the canned coconut milk is the only way I know to replicate the creaminess.

Enjoy!

***Notes***
  • For benefits of medium chain fats found in coconut milk, as well as other benefits, click on this link
  • Sometimes the fat in canned coconut milk solidifies in the top of the can. This is okay, just scrape it out and place in your container. Be sure it is all blended well in your mixture. If this is proving difficult, the canned milk should be used as the one to heat on the stove along with your cinnamon.
  • In the recipes below, the only time you need to heat anything on the stove is if you are using ingredients that are solid or "gritty" in texture that you would want to dissolve completely like cinnamon, raw cacao or pumpkin and if using granulated sugar crystals. Otherwise, skip the heating process.
***Additional flavors (omit cinnamon, vanilla and almond from recipe above)***

French Vanilla Creamer: 2 teaspoons organic vanilla extract or vanilla coffee syrup (i.e. Torani)

Vanilla Bean Creamer: 2 teaspoons vanilla bean paste

Chocolate: 1 Tablespoon raw organic cacao powder

Chocolate Almond: 1 Tablespoon raw organic cacao powder and 1 teaspoon organic almond extract

Irish Creme: 1 Tablespoon raw organic cacao powder, 1 teaspoon instant coffee, 1-2 teaspoons organic vanilla extract and 1 teaspoon organic almond extract

Peppermint Patty: 1 Tablespoon raw organic cacao powder and 1 teaspoon peppermint extract

Pumpkin Spice: 3 Tablespoons canned pumpkin puree, 1 teaspoon pumpkin pie spice, up to 4 Tablespoons maple syrup (omit sugar from recipe above), and 1 teaspoon organic vanilla extract

There are multiple other options like Chocolate/Raspberry, Caramel, Chocolate/Caramel, Hazelnut, Almond Joy and Salted Caramel. Many of these I left off because I didn't know of a substitute for the ice cream topping the original called for. But if you wanted to make your own organic caramel syrup or use brown rice syrup instead, you could continue with a healthier version of these as well!


Sweet 'n Sour Cucumber Salad


With the birth of one of our children about 15 years ago, we received a meal from a Sunday school classmate that included this salad. I asked her for the recipe and she happily obliged. I've been making it ever since. Usually during cucumber season, I make it at least once. But today, I couldn't find the recipe...so from memory (I hope I'm right)...here goes.


Thinly slice 1 medium white or yellow onion and saute until tender in a scant amount of olive oil. Stripe-peel your cucumbers and slice. With normal cukes, I slice them thin, usually with the food processor. But these long skinny english cucumbers, I sliced thicker.


Place the sliced cucumbers and onions in a glass bowl of salted water and let set for about two hours. Yes, there will be a little bit of oil in the water.


After two hours, drain all veggies in a colander and rinse with cool water. Here's where you remove as much of the oil as possible.


While the cucumbers are draining, on low to medium low in a small saucepan, cook 1 cup organic evaporated cane juice, 1/2 cup white vinegar and about 2 teaspoons of celery seed until the sugar is dissolved. Stir or whisk frequently and it should be done before it starts to boil, although there may be a few bubbles around the edges.

Place the veggies in a plastic or glass bowl and pour the syrup over the top. You can either stir them or place a lid on top and give it a few good shakes and turns. These are best when they've had a few hours to let the flavors meld together in the refrigerator. This recipe is really easy to double too. I had too many cucumbers today, so I quickly stirred up a second batch of the sugar/vinegar syrup. This is also a recipe that an organic version should be easy to put together. My organic evaporated cane juice crystals are vegan too. You could probably use organic sucanot in place of the cane juice crystals, but it may alter the taste some.

Enjoy!


Tuesday, August 6, 2013

Fresh Corn and Tomato Salad


I don't know about you, but I love salsa...and I have a bevy of recipes to prove it. But, if I am attempting to live a healthier lifestyle, I must admit that I don't need all of those accompanying chips. Imagine my delight at finding this recipe today on the back of the plant marker from my yellow pear tomatoes.


You see, it's a salad. I know that term is foreign to many in the U.S., so just think salsa...without the kick and you'll find it to be just as tasty as I did. And just like salsa, I think you can modify the recipe to include whatever you have on hand and tailored to your taste preference. 

First thing you do, is prepare an ice water bath by filling a large bowl halfway with ice and water; set aside.
Cut your fresh corn off the cob. Yes, this is the messiest part. Don't be surprised if kernels go flying. You need about 5 cups which may be 7-8 medium ears. I had 6 and that was plenty.


Bring a large pot of salted water (original recipe suggests heavily salted, I did not) to a boil over high heat. Add corn kernels and cook until tender, about 4 minutes. Drain and place in the ice water bath until cool, about 4 minutes.


Next in a large, non-reactive bowl (I used glass), combine 2 Tablespoons lemon juice (can use fresh), 1 1/2 teaspoons sea salt, 1/4 teaspoon fresh ground black pepper. While continuously whisking, add 3 Tablespoons olive oil in a steady stream until completely blended. 

Add about 10 ounces of tomatoes. Original recipe calls for yellow pear tomatoes to be halved. I had a variety of tomatoes (Arkansas Traveler, red cherry and yellow pear) so I cut into bite-sized chopped pieces. Also add 1/2 cup red onion, diced small and 1/4 cup fresh basil, thinly sliced. Throw the cooled corn into the mix and toss in the bowl until well coated.

That's it! And just like salsa, it is very forgiving. I did not measure anything and it turned out great. The initial tasting was good but I've stuck it into the refrigerator and covered it the flavors can meld a little more.

There is a plethora of corn and tomatoes around here right now, so with just a few ears of corn from a farm down the road, some tomatoes and basil from my back patio and an onion and condiments I had on hand, a new tasty side dish was created.

Try mixing in a different herb or adding in a sweet bell pepper (green, red or yellow) and see what you can create too. You may have caught on that the only difference here from salsa is cilantro vs. basil, lemon vs. lime juice, olive oil added and no hot pepper...so if you absolutely need your salsa fix, this is a good base recipe to start.

Enjoy!


Saturday, August 3, 2013

Homemade Natural Toothpaste


For the better part of two plus years, I have been making and using my own toothpaste. Recipes abound on the internet and I don't recall where I found this one. The first dentist appointment I had after I'd been using this for several months, I admittedly was worried about the condition of my teeth, but phrases like, "Your teeth look great," "You have very little tartar," and "Keep doing what you're doing," have been repeated every six months without fail.

I confess I am not a consistent flosser and my gums do get irritated as the hygienist cleans, but when my gums are "measured" and the dentist peaks in, I am always told, "Well, you could pick up on your flossing a little to keep the irritation down, but other than that...it all looks great."

I'll take it!

And my homemade version is cheaper than anything you can buy in the store. It's a win-win.


There are only three ingredients: coconut oil (I use organic, extra-virgin), baking soda, and peppermint essential oil. In a glass container with a lid, place 2 Tablespoons oil, 3 Tablespoons soda and 20-25 drops of essential oils (your flavor preference of course) and stir. That's it. The whole thing takes five minutes tops.

My only words of caution are these: the oil will be soft, almost liquid in warm weather and your sink will have oil in it and will need cleaned frequently. But the oil cleans easily with a scrubbing cloth or sponge. And don't talk to me about fluoride. Don't swallow what you've been told by dentists and an industry that attempts to unload hazardous waste on unsuspecting people. Do your own research and decide for yourself if toxic waste is something you want placed in your body.


Health benefits of coconut oil include anti-bacterial and anti-microbial properties. Baking soda scrubs and gives your teeth that "fresh from the dentist feeling."

Thursday, July 18, 2013

Coffee Toffee Ice Cream


This recipe is adapted from a Matcha Mint Ice Cream recipe Abbey tried last spring. I've made this once before and thought I'd share the recipe this time.

For whatever reason, our Kroger coconut milk only comes in 399 ml cans. That's a weird amount...don't you think? So I have had to adapt the recipe even further to accommodate mismatched supply sizes.


Take two cans of full fat coconut milk (and take a deep breath and remind yourself that healthy fats are not the devil incarnate!) and put the entire contents in a medium saucepan. If the cream is solid at the top of the can...even better! Stir in about 4 Tablespoons of brewed coffee or the instant equivalent. Yes, I prefer Starbucks, but for recipes I use the cheap stuff we already have on hand.


Heat these on a stove top on medium heat, just until the liquid is starting to boil. Remove from heat and pour into a bowl. Stir in about 1 teaspoon vanilla and 1/2 cup agave, honey or sweetener of your choice. (If you use sucanot or granulated sugar, stir briskly to dissolve.) Whisk or stir mixture until well blended.


Place bowl in freezer for about one hour. Following your ice cream freezer directions, pour mixture into ice cream maker's container and churn.


When the ice cream freezer begins to sound like it is struggling, stop the machine, carefully remove lid (being sure to keep rock salt and ice out), sprinkle with crushed toffee bar pieces, chopped almond pieces and drizzle caramel ice cream topping on it. Allow machine to finish churning.


When complete, either enjoy right away or place in a deep freezer to obtain a firmer ice cream.

Variations:
  • Use a different type of nut other than almonds.
  • Add more or less coffee according to taste. Decaf or regular is up to you.
  • Add chopped chocolate bits or mini chocolate chips in place of, or along with the toffee bits.
  • Delete caramel and drizzle on top when serving or stir in after ice cream is complete, but before you place in deep freezer.
Technically this is vegetarian, but I would love to create a vegan version. I really don't know if it's possible, outside of making my own caramel sauce and toffee.

Saturday, June 8, 2013

Baked Kale Chips Recipe


I know there are a lot of kale chip recipes available on the internet and elsewhere, so I am not attempting to reinvent the wheel. Basically, I wanted to show you how easy it is to make a healthy snack that tastes great too.


Take one bunch organic kale and cut leaves away from the stem. You can tear or cut with a knife or kitchen shears.


Then wash the leaves and use a salad spinner to get rid of excess water.


Place in a bowl and drizzle with about one Tablespoon olive oil. 


Next, you add any seasoning you want. We've tried garlic and sea salt, Italian seasoning and sea salt or Ani Phyo's sea salt, chipotle and agave syrup.


Last step is to place on a parchment lined, non-insulated baking sheet and bake at 350°F for 7 to 10 minutes. Some recipes call for up to 15 minutes, but I start checking them after 7 so they don't burn.


For some of the benefits of kale, see my previous Superfood Salad Recipe post. Optimally these should be dehydrated to retain all of their living enzymes and micronutrients. But if, like me, you don't have one yet, this method will work well. Enjoy!

Friday, June 7, 2013

Tasty Superfood Salad Recipe


Our Hebron Kroger Marketplace is basically my second home. Nary a day passes but what I am there...especially with all of the fresh produce I have gone through recently. Over the last few years our family has looked forward to the yummy samples throughout the store. No joke...there have been some days when there are so many that we can literally eat a light lunch as we walk through the store. 

Admittedly, there are normally very few vegan options in the samples. Imagine my delight yesterday when I found this wonderful salad that they called "Taylor Farms Superfood Salad". At $6.99 per pound, I bought a 1/3 pound container. After eating it for my lunch yesterday, I determined to see if I could duplicate it more cheaply. I don't think my expense was much less, but my version (pictured above) had more organic and raw ingredients and would make enough to feed the whole family. I'll list the ingredients, but there's no real recipe...adjust it as you desire.


Organic baby kale, torn or chopped into bite size pieces. Whole blueberries and organic grape tomatoes. Chopped red onion, sweetened dried cranberries, chopped organic raw cashews, organic raw sunflower seeds...


And Lighthouse Pomegranate Blueberry Vinaigrette. I didn't compare any dressings and this one does have sugar...but it must be nominal or the vinegar counteracts it because it didn't leave me thirsty like I have been experiencing lately when I've even had a small amount of sugar. It doesn't have soy oil or high fructose corn syrup though so I was excited! 


Place all ingredients in a container, including the dressing, cover with a lid and shake until well mixed. This is delicious and the baby kale isn't too chewy (my biggest dislike of kale). The only variation from the Kroger version is that they included edamame, which I left out because I am attempting to avoid soy. Enjoy!

The amazing health benefits of these RAW ingredients include:

  • Kale is low-calorie, zero fat, high in fiber, iron, Vitamin K (great for bone health and blood clotting), and is filled with antioxidants. It is an anti-inflammatory food and is also high in Vitamins A and C and calcium. It is a powerful detoxifying food.
  • Blueberries are also loaded with antioxidants, but are great for brain health too. They are low glycemic and chock-full of Vitamins K and C, manganese and fiber.
  • Red onion is packed with the bioflavenoid quercetin, which is great at scavenging free radicals. This antioxidant is cancer fighting, anti-bacterial, and anti-inflammatory. It is being studied for its ability to prevent and control intestinal polyps and for suppressing rhinoviruses that are an underlying cause of the common cold. Allicin, also in onions, has been shown to promote cardiovascular health, prevent and treat cancer and reduce high blood pressure. Allicin, may also help people with dandruff because of its anti-fungal properties. The chromium contained in red onions makes it a great food to fight insulin resistance and there is more...but I have additional foods to get to.
  • Tomatoes are a great source of Vitamins C, A, and K, plus folate and potassium.They also provide thiamin, niacin, Vitamin B6, magnesium, phosphorus and copper. The lycopene and beta-carotene found in tomatoes can make your skin look great and reduce the damage caused by harmful UV rays.
  • Raw cashews are a good source of healthy fats, protein and fiber. They are loaded with manganese, copper, magnesium, phosphorus, and tryptophan which can help elevate moods, thus combating depression. I recently heard in the documentary, Food Matters, that just one handful of raw cashews a day can significantly decrease the side effects of depression. Yet, in our fat-crazed society...we are overly concerned with consuming the fat. Your choice...anti-depressants or tasty cashews?
  • Raw sunflower seeds are the mighty food in this salad. Don't let their tiny size fool you. Sunflower seeds have a high oil content that is a good source of polyunsaturated fats. They are also overflowing with Vitamins E, B1 and B6, manganese, copper, tryptophan, magnesium, selenium, phosphorus and folate.
  • Edamame (optional) in only a one cup serving has at least 6% RDA of all the nutrients you need, except Vitamin D. They also provide 20-40% of your RDA for protein, fiber, iron, magnesium, manganese, phosphorus, folate and Vitamin K. Since edamame is a soybean, it contains isoflavones that are similar to estrogen. Therefore, they can be helpful in reducing mood swings, hot flashes, and other hormonal stressors. According to research, if you have a normal level of estrogen, soy can attach itself to receptors first, thus making your estrogen levels go down. A word of caution though...I know women in whom soy has had harmful effects upon their hormone levels. I suggest using soy sparingly.
As stated above, I know with the dried sweetened cranberries and the salad dressing, there is sugar added, so eat this salad in moderation. But if I have to choose between this and caving in to a sweet craving...this is definitely the optimal choice!


Chocolate Mint "Larabar" Recipe


I'm trying to get some healthy foods prepared for our vacation and homemade "Larabars" are at the top of my list. I thought since some of you have been following my journey toward better health, I'd share the preparation experience with you. There's no baking or cooking involved...it's that easy, and being mostly raw, they're that good for you too.


Start with a packed cup of pitted dates. I have always used Medjool dates in the past, but due to the cost, I recently purchased Deglet Noor dates that were not only cheaper, but already pitted too. They taste exactly the same as the Medjool ones.

Medjool on the left, Deglet Noor on the right.


Then, in a food processor (or blender), grind 1 cup of raw almonds until they are in small pieces. There is no magic size...it is completely based on your preference. Empty the nuts into a bowl and take about 1/4 cup to dust your pan. I use an 11 X 7 inch Pyrex, but for thicker bars, we have used a glass bread loaf pan.


Next I took a small handful of chocolate mint, right off my back patio, rinsed and removed the leaves from the stem and chopped the leaves into small pieces in the food processor. It's okay to leave some of the almond crumbs in the processor because they actually help keep the next step with the dates from sticking.


Leaving the mint in the food processor, add the dates to it and grind/chop them a few pulses. Add about 1/2 Tablespoon of raw cacao powder and continuing pulsing the mixture until it begins to form a ball.

Place the date mixture in the bowl with the almonds and with your hands...get messy...and mush it all together until the nuts are evenly distributed throughout the dates. Now, press the mixture into the prepared pan. You can attempt to get it evenly spread, but for me the unevenness is fine.


Refrigerate for about an hour or until set up fairly well. They will not get hard. Cut and serve or place in covered container and keep in the refrigerator. These usually don't last long, but we have had them in the fridge for over a week and they are fine.

This was the first time I've tried this flavor combination and they are delicious! This recipe is easily modified with different nuts [Abbey's favorite of cashews, vanilla and a pinch of salt] or flavors [lime or lemon juice instead of mint and cacao] and items such as dried fruit [dried cranberries and raw cacao make a great black forest cake flavor] or coconut [Key lime, my favorite!] can be added if desired.

Enjoy this whole foods, raw treat without regret. Here are some of the health benefits:

  • Dates contain protein and fiber and trace elements of boron, cobalt, copper, magnesium, manganese, selenium and zinc.
  • Raw cacao is a superfood that contains theobromine which can help treat depression. It is very high in antioxidant flavanoids, sulfur and magnesium. It also has the highest amount of iron found in any food source...16% of your RDA for iron in only 1 ounce
  • Raw almonds are high in monounsaturated fats (a good fat), rich in antioxidants, can help stabilize blood sugar, high in Vitamin E and a good source of Vitamin B2, and may even help with weight loss.
  • The Mint herb leaves are great for gastrointestinal disorders, helps the liver and calms indigestion. It contains menthol, Vitamin C and antibiotic substances. It can treat diarrhea, gastric fever and toxic infections. It is recommend for asthma, bronchitis and flu because of its antispasmodic and sedative properties.